Updated June 13, 2006: Changed part number!
If you want to try working on your own 600X, I would highly suggest that you first download the IBM Hardware Maintenance Manual, a 932KB Adobe Acrobat PDF file. This manual contains very detailed drawings on how to disassemble the laptop.
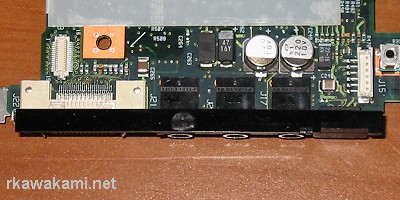 On the right side of the IBM 600X laptop, there are three 3.5mm jacks for headphones, line input and microphone input.
As shown on the picture to the left, they are soldered directly onto the motherboard. All three appear to be made by
Foxconn, and they seem to be the identical part. They all have the same six pins,
arranged in an identical layout. To get a slightly better look at them, you will need to remove the black plastic frame that
sits above the jacks and has the window for the infrared port. To do this, remove the two screws next to the external
floppy disk connector.
On the right side of the IBM 600X laptop, there are three 3.5mm jacks for headphones, line input and microphone input.
As shown on the picture to the left, they are soldered directly onto the motherboard. All three appear to be made by
Foxconn, and they seem to be the identical part. They all have the same six pins,
arranged in an identical layout. To get a slightly better look at them, you will need to remove the black plastic frame that
sits above the jacks and has the window for the infrared port. To do this, remove the two screws next to the external
floppy disk connector.
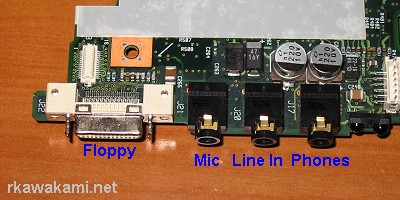 Here's what the jacks look like without the plastic cover. All three jacks are encased in black plastic, without any
identifying marks besides the name "Foxconn", and a couple of single-digit numbers stamped into the plastic (6 for the
headphone and line in jacks, 3 for the microphone). These could simply be molding identifiers. I have since removed the
headphone and microphone jacks and there are no identifying marks on the bottom.
Here's what the jacks look like without the plastic cover. All three jacks are encased in black plastic, without any
identifying marks besides the name "Foxconn", and a couple of single-digit numbers stamped into the plastic (6 for the
headphone and line in jacks, 3 for the microphone). These could simply be molding identifiers. I have since removed the
headphone and microphone jacks and there are no identifying marks on the bottom.
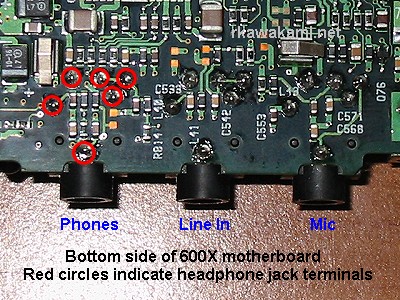 This is the bottom side view of the motherboard showing the three 3.5mm jacks. I have circled six places where the jack
is soldered onto the motherboard. As far as I can determine at this time, the jacks are Foxconn part number JA6333L-100-TR,
although this part does not seem to officially exist at the Foxconn web site. A search of distributors does show this part
to exist and be in stock. The closest part number that does exist at Foxconn is JA6333L-101-TR. The only difference between the two is in the "tail length",
basically the length of the leads as measured from the bottom of the jacks. An Adobe Acrobat datasheet is available at that
site but requires the latest Chinese language update in order to view it. The jacks match the physical dimensions and appear
to have the proper terminal layout. I have tried to locate a distributor who sells single-unit quantities of this type of
jack, but so far I have been unable to find one. I have tested both the headphone and microphone jack after removal from the
motherboard and they electrically test the same. You should be able to swap any one of these three jacks with each other.
This is the bottom side view of the motherboard showing the three 3.5mm jacks. I have circled six places where the jack
is soldered onto the motherboard. As far as I can determine at this time, the jacks are Foxconn part number JA6333L-100-TR,
although this part does not seem to officially exist at the Foxconn web site. A search of distributors does show this part
to exist and be in stock. The closest part number that does exist at Foxconn is JA6333L-101-TR. The only difference between the two is in the "tail length",
basically the length of the leads as measured from the bottom of the jacks. An Adobe Acrobat datasheet is available at that
site but requires the latest Chinese language update in order to view it. The jacks match the physical dimensions and appear
to have the proper terminal layout. I have tried to locate a distributor who sells single-unit quantities of this type of
jack, but so far I have been unable to find one. I have tested both the headphone and microphone jack after removal from the
motherboard and they electrically test the same. You should be able to swap any one of these three jacks with each other.
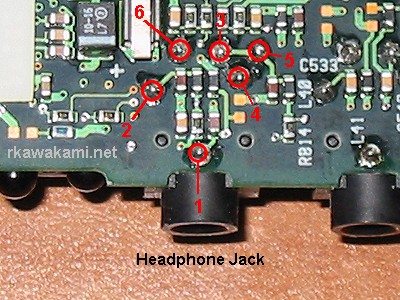 This is a close-up of the headphone jack, showing the six pins that are soldered onto the motherboard. The two black
pins to either side of pin 1 are alignment pins used to insure that the jack is correctly mounted to the board. Remember
that this is the bottom side view of the motherboard; if you are going to attach wires to the top side of the motherboard,
then you will need to mentally "reverse" the pinouts.
This is a close-up of the headphone jack, showing the six pins that are soldered onto the motherboard. The two black
pins to either side of pin 1 are alignment pins used to insure that the jack is correctly mounted to the board. Remember
that this is the bottom side view of the motherboard; if you are going to attach wires to the top side of the motherboard,
then you will need to mentally "reverse" the pinouts.
                      Headphone
     Stereo Jack      jack pin #

Ground/shield/sleeve      1
       Ring               3
       Tip                2
For additional information on plug and jack wirings, check out the Wikipedia Tip Ring Sleeve entry.
Another possible solution to a broken (or missing) headphone jack is to plug the laptop into a docking station. On the back side of the docking station is a line out jack. This could be fed into powered speakers or an amplifier, which in turn could have a headphone plugged in.